Showing posts with label free pattern. Show all posts

Wednesday, October 1, 2014

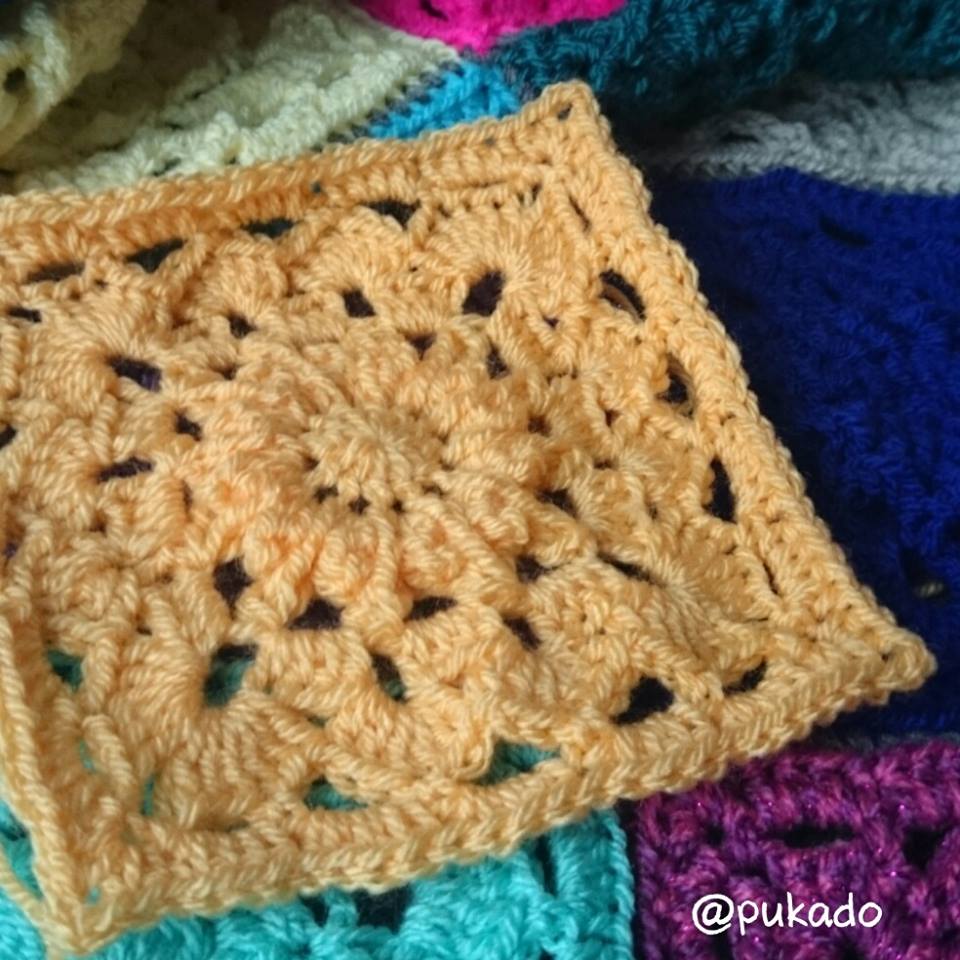
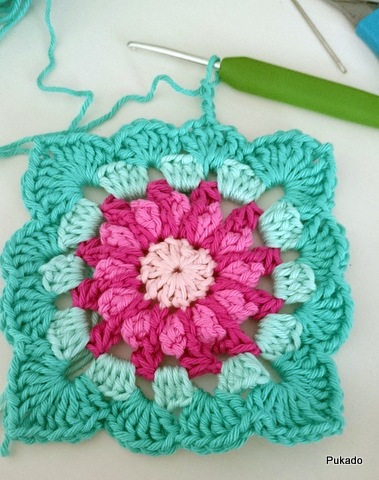
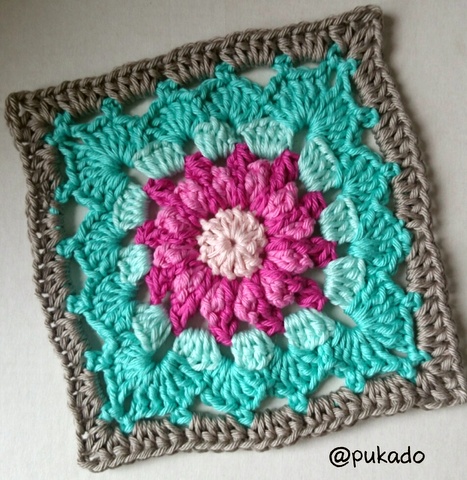
Crochet Mood Blanket 2014 - October Square - Free Pattern

Crochet Mood Blanket 2014 - October Square by Pukado


Happy 1st of October! 10 months already, can you believe it?? So I should have 80 squares soon, but I’m a bit behind :( still need to 6 squares from September and 6 squares for October. I will get it done before the month is over!!!
2014-09-29 11.43.37.jpgBut I have been so busy this month, it just didn’t happen. As some of you know, I have an autistic boy at home. That’s why I’m a stay at home mam and how I came to be a crochet addict. In his little autistic world, he can’t go outside without a hat on. In summer he has his caps and his paddy cap. And in winter he has his warm earflap hats. It all started with the angry bird hat I made him 2 years ago. No clue how to crochet, but determined to make my boy happy and give him an angry birds hat. And he was happy. My boy loves his videogames, angry birds, PVZ, Minecraft, Pokemons, Pacman, etc. And to make something for him, gives me so much joy, it’s like a drug to me!


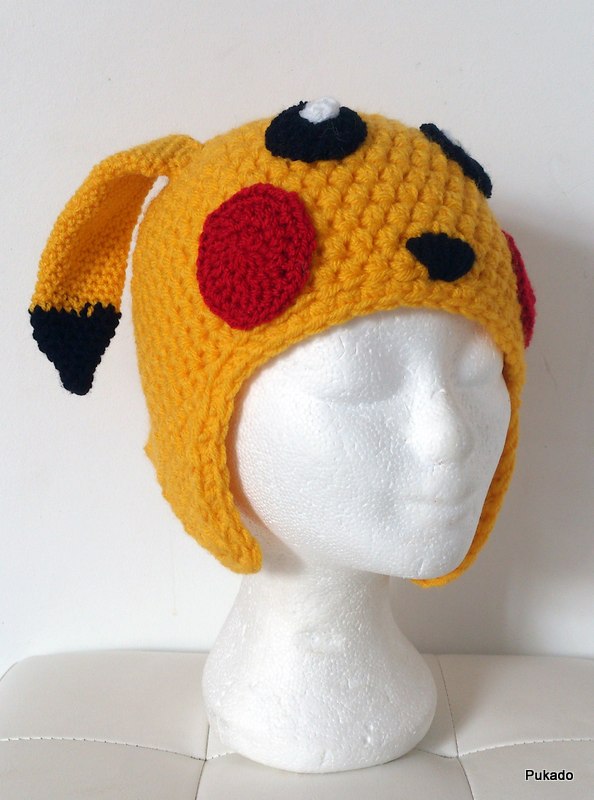
I made him a Pikachu Hat and he loved it so much, he hasn’t taken it off since (except in the bath). He will tell me what kind of hat he wants and I try to make it. He has requested several other pokemon hats since then, but I have other stuff to create as well hahaha

But I was busy this month for him, a hospital visits (to get his tonsils out), lots of appointments, lots of talks and trying to find the best school for him. And to keep my mind occupied at night, I create new designs. Repeat designs are not good for relaxing in my case, I need a challenge. So I made a lot of patterns this month. I’m especially proud of my V-Licious hat and my P2P shawl (pattern is at the tester!)
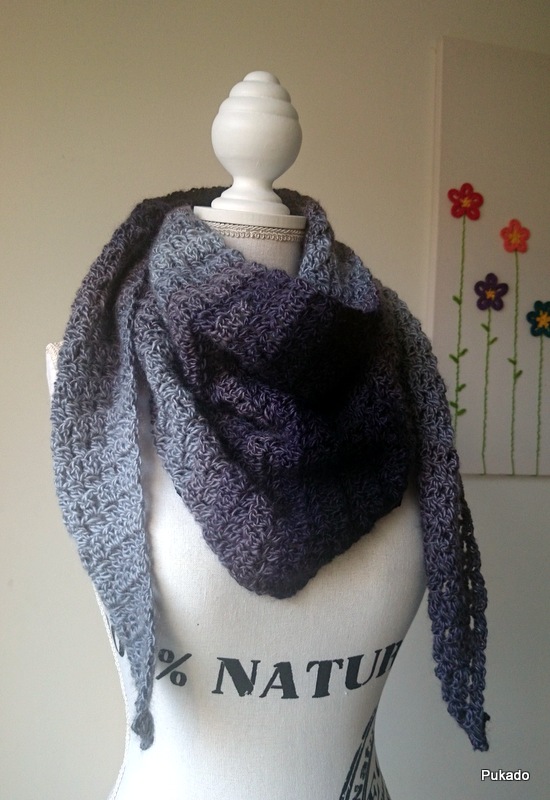
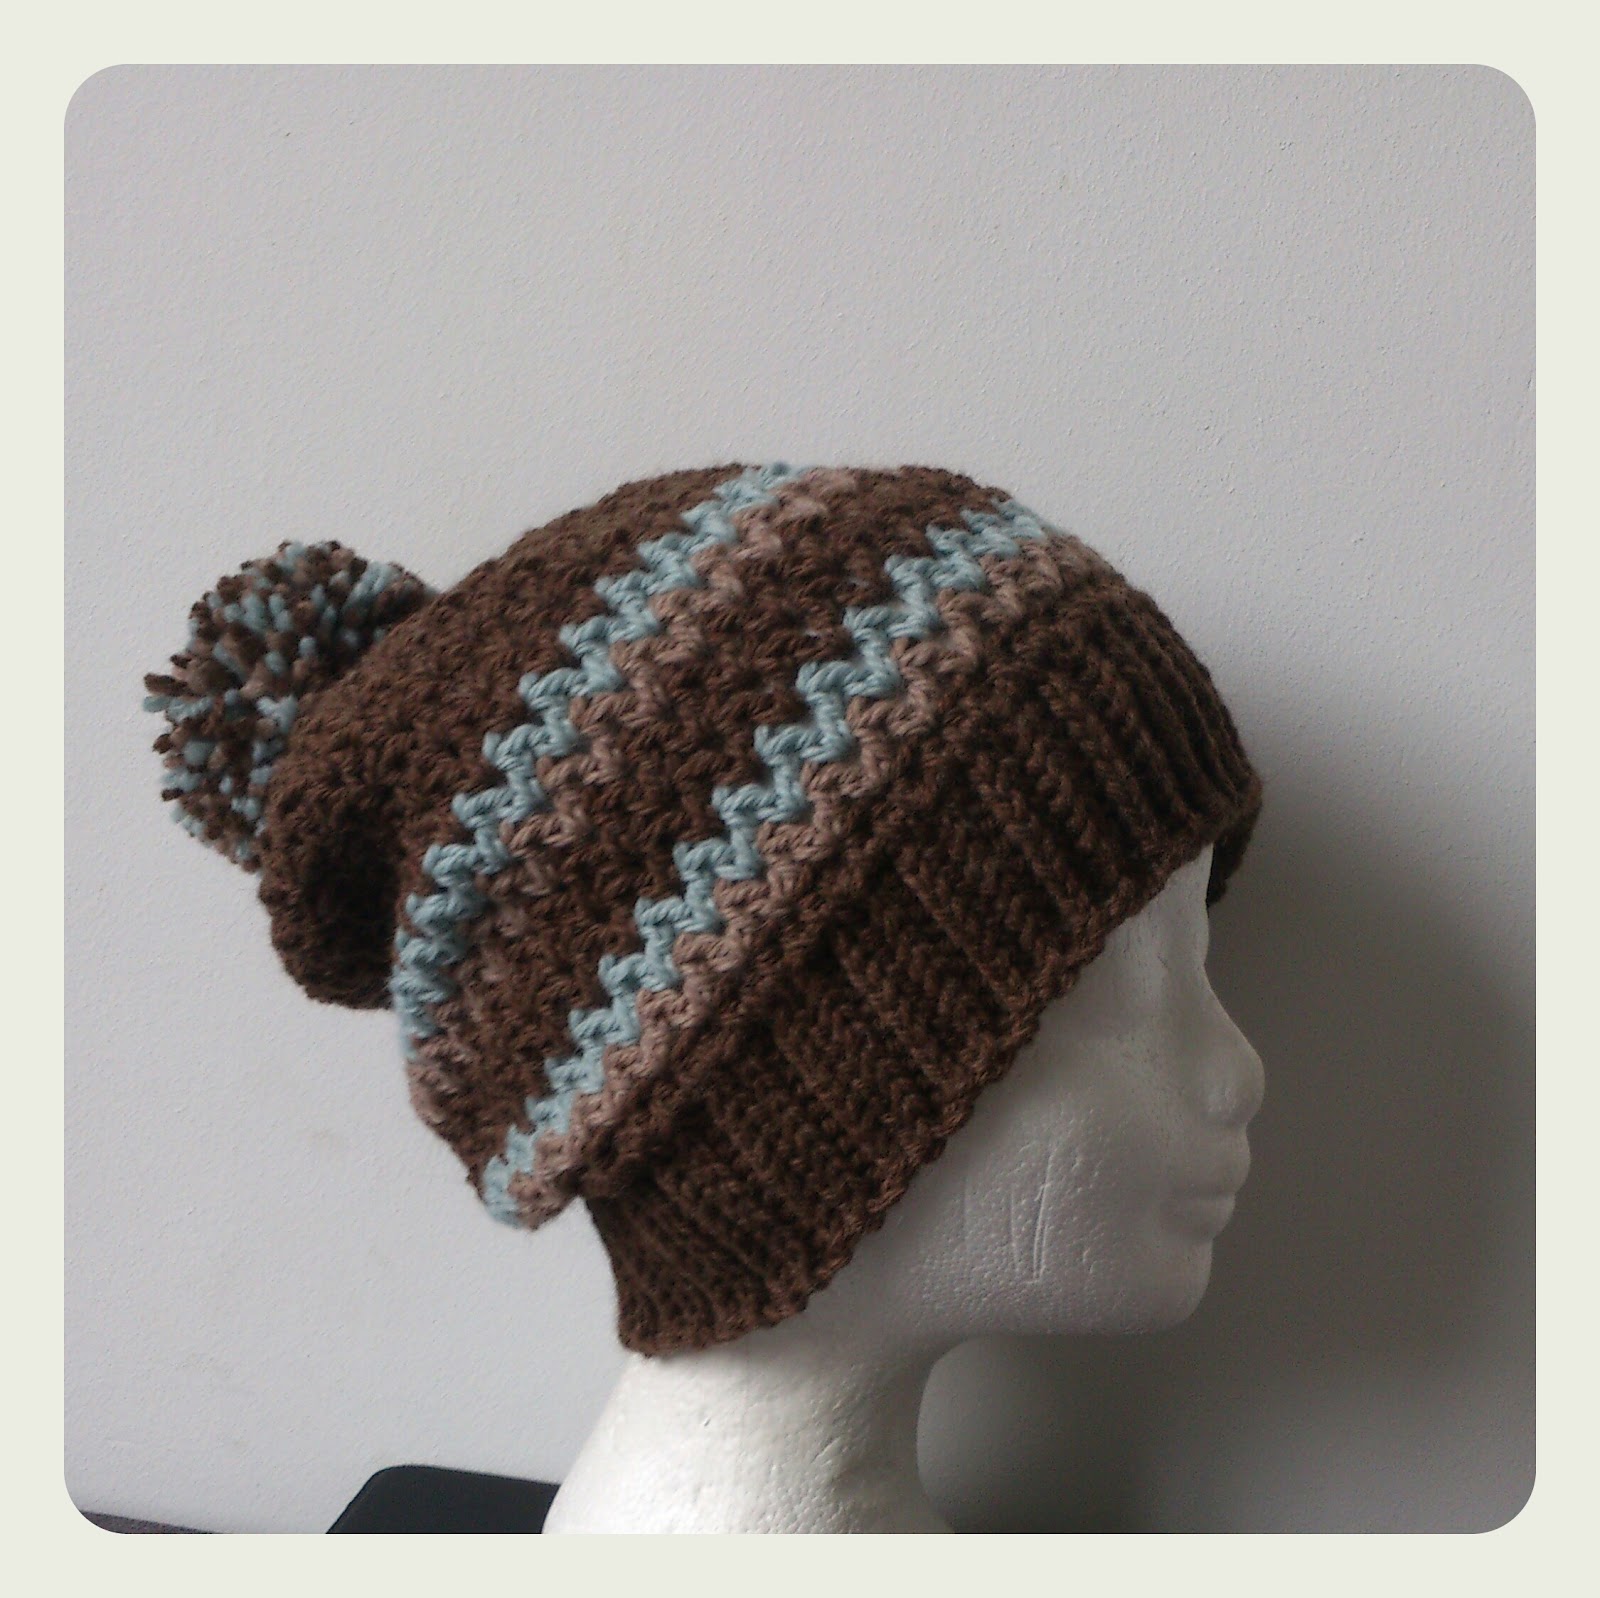
 
P2P                        V-Licious

So that’s why I’m a bit behind, but nothing a couple of evenings can’t solve.

So on to October. Again, I used stylecraft DK and hook size 4.5mm for my mood blanket.

For the multi colored one I used Catania cotton and hook size 3.5mm.


In the photo’s I will not fasten off after every color change, as I’m making my squares in solid color and only use the multi colored one for the pattern to show you how it looks. So excuse the ends :)

R1, MC, 12DC in MC - 12st
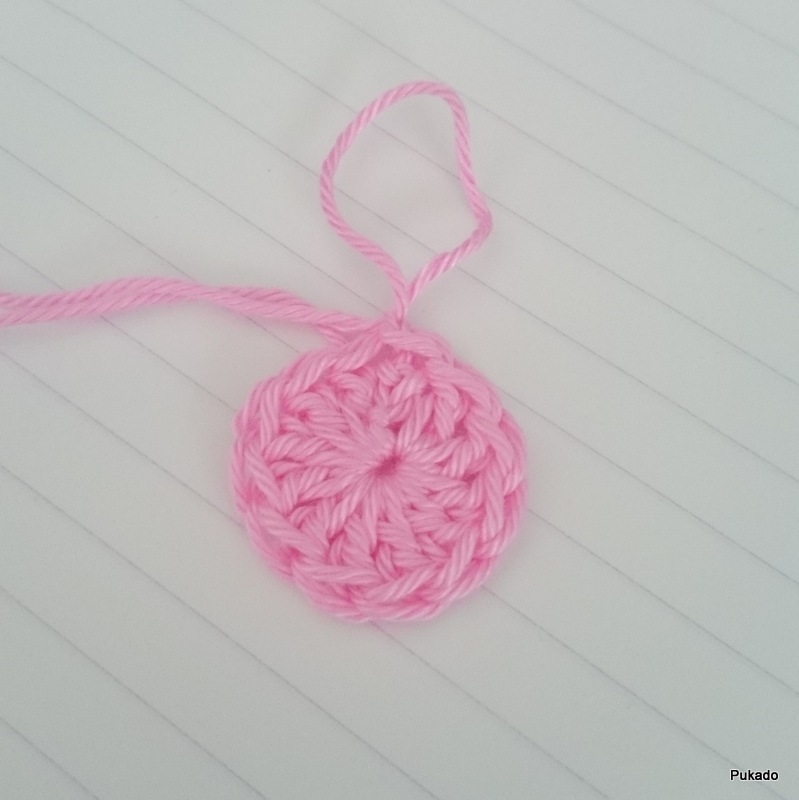


The following row will be split in 2 if you are using more than 1 color.

If you’re using only 1 color, please follow:

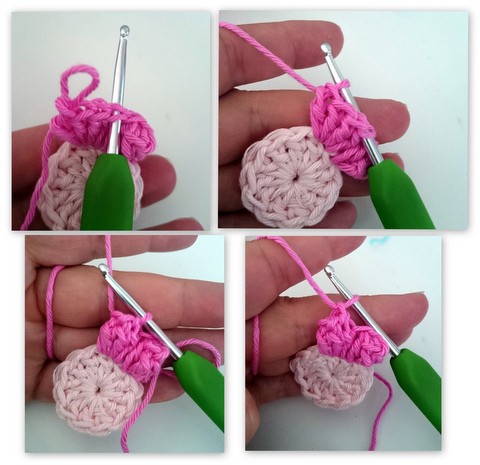
R2, *CH3, SC in sec CH from hook, SC in last CH, SLST in same st, SLST in next st, CH3, DC3Cluster, CH3, SLST in same st, SLST in next st* repeat around, SLST to first CH of CH3
SLST twice up to the top of the first CH3 to start R3

If you’re using multiple colors, please follow:

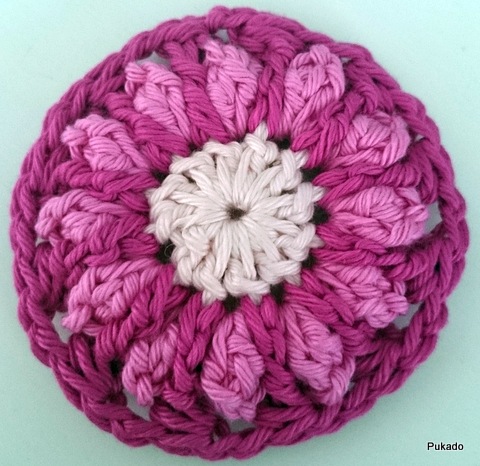
2A, SLST to random st, *CH3, DC3Cluster, CH3, SLST in same st, SC in next st* repeat around, SLST to first SLST

2B, SLST in between flower petals in stitch of R1, *CH3, SC in sec CH from hook, SC in last CH, SLST in same st, CH3 (behind flower petal, fold petal forward for easy access), SLST in next st of R1 in between flower petals* repeat around, SLST to first SLST

Fasten off and start R3 on top of the first CH3 with new color.


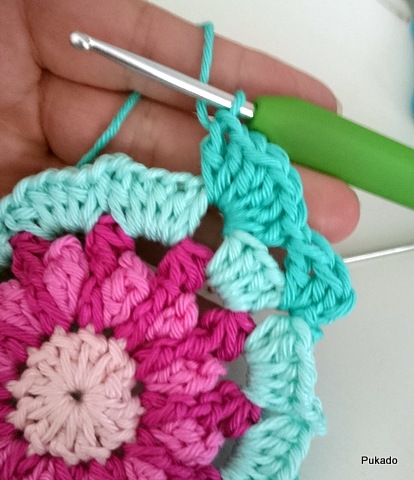
R3, *CH3, SLST on top of next petal, CH3, SLST on top of CH3* repeat around, SLST to first CH3, do not fasten off to change color
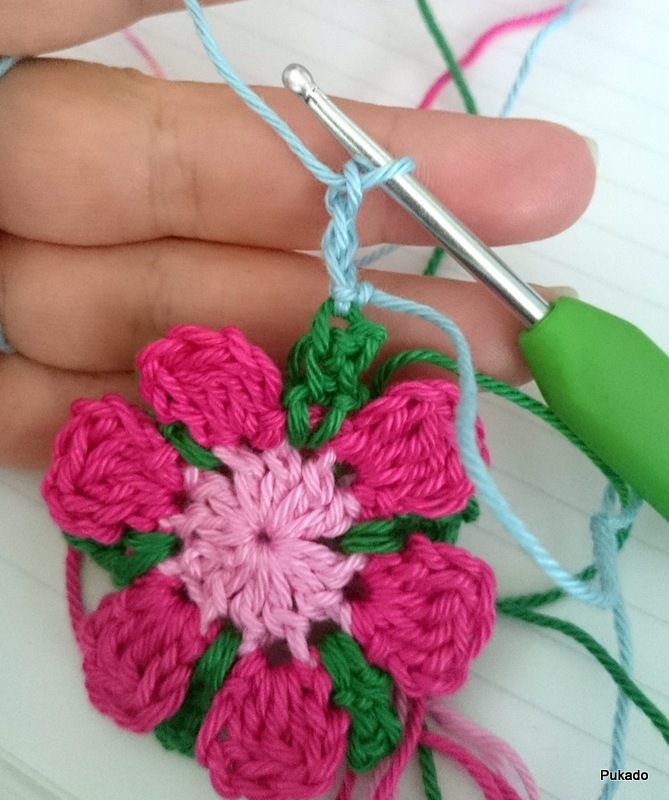
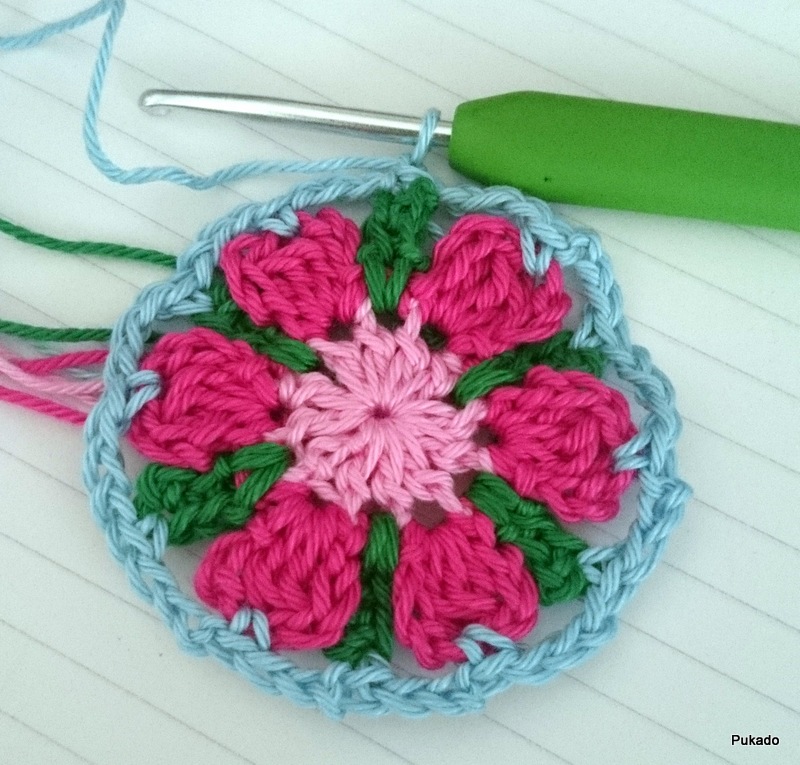
R4, SLST in first CH3Space, CH1, 3SC in same CH3Space, *4SC in next CH3Space* repeat around, SLST to first SLST


R5, CH2, FPHDC in next 2st, BPHDC in next st, CH2, *BPHDC in next st, FPHDC in next 2st, BPHDC in next st, CH2* repeat around


R6, (If working in 1 color: R5 ended just in front of the first CH2Space on the side, so that’s where I pick up again, by starting in the last CH2 you made. If working with a new color: SLST to random CH2Space), 3DC in CH2Space, 6DC in next CH2Space, *(6DC, CH2, 6DC) in neaxt CH2Space, 6DC in next 2 CH2Spaces* repeat around, last series you will add 3DC to first CH2Space to complete the series. Do not fasten off, you will continue R7 in same color.
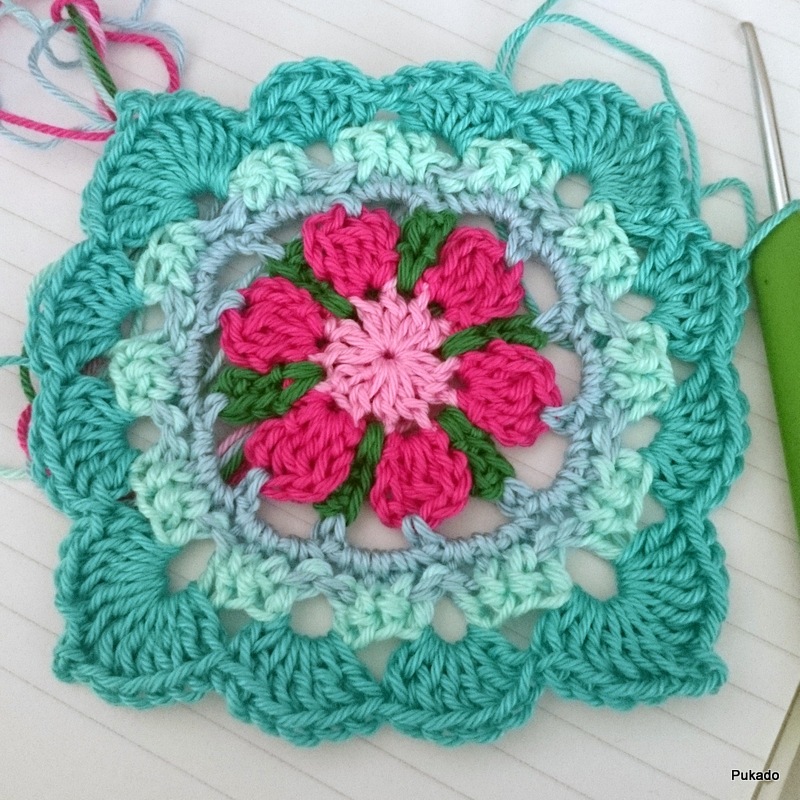

R7, *CH3, SC on top of the next shell, CH3, SC on top of the next shell, CH3, SLST in corner CH2Space, CH3, SLST in same corner space, CH3, SC on top of the next shell, CH3, SC on top of next shell* repeat around


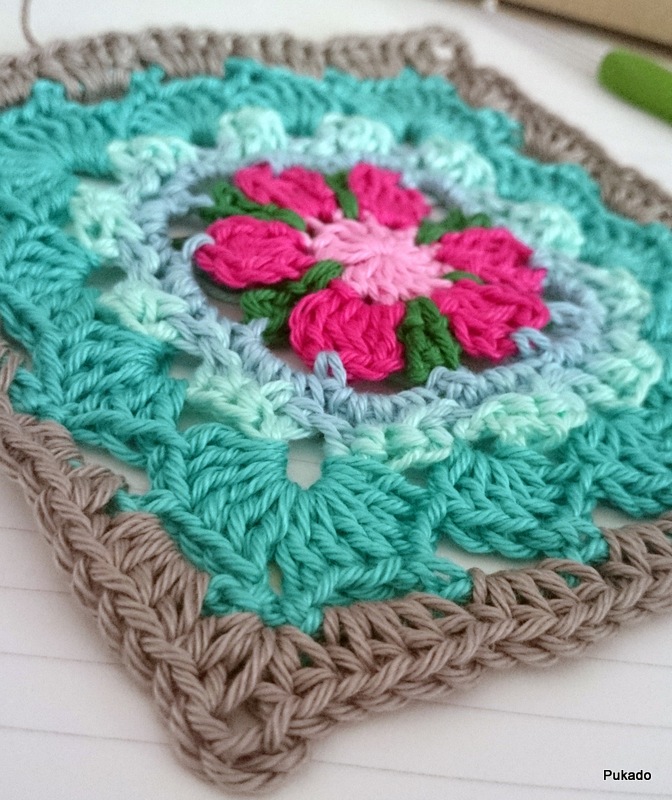
R8, SLST into next CH3Space, CH2, 3HDC in same CH3Space, *4HDC in each of next CH3Spaces until you reach a corner, 2HDC, CH2, 2HDC in corner space* repeat all around, SLST to first HDC.

Fasten off with invisible join, weave in all ends.


Copyright Patricia Stuart 2014 ©.
You are free to create from the pattern and sell the creations.
Please do not copy, rewrite, resell or distribute as your own, this is prohibited.
Please give credit to my blog or Ravelry shop for the pattern and if you sell finished items online,
please provide a link to my blog or ravelry for the pattern.
Thank you for your understanding.


Please visit my blog: Pukado - Blog
Please visit any of my shops at Etsy, Ravelry or Craftsy
FaceBook me! @Pukado
Follow me on Pinterest


Monday, June 16, 2014

Crochainting - Crochet and a Canvas - Tutorial by Pukado

Update! March 5 2015
You can download a pdf file with the flower pattern and additional patterns here in my ravelry http://www.ravelry.com/patterns/library/creating-a-crochainting#

I just finished my flower cushion cover and I was loving it. It looked so bright and happy. Then I spotted the canvas I had stuck in a corner, I had the idea of making something artsyfartsy for my living room wall. I wanted something bright and happy above the sofa. I had a million ideas, but none of them I was able to realise.


But then it hit me! Why not recreate the cushion cover on canvas? So I made a bunch of flowers and just went from there on.. and it worked and I'm totally in love with it! It's hanging above the sofa, injecting color and happiness in my living room!


The feedback I received on facebook/instagram was overwhelming and amazing. So I will be recreating the canvas, a bit smaller, as the original is 100cm by 70 cm.

And I just notice there is a flower missing in the original canvas! Haha! Will fix that!

The canvas I will be using for this is 30cm by 40cm.

Other supplies:

Yarn:
Phildar No3 or Catania in different colors for the flowers
Catania Grande for the flower stems

Crochet hook size 3.5mm
Yarn needle with a sharp point

Scissors

Glue gun or glue dots

Pencil and ruler

Step 1:

Take the width of your canvas and calculate how many flowers you will need.
I have 40cm and will add a flower every 4 or 5 cm, I like it a bit uneven. So I will need 8 flowers.
It will depend on how big your flowers are. I will only use 2Rounds flowers (so flowers created with only 2 DC or HDC rounds)

Crochet 8 flowers of your choice.


Draw lightly with a pencil lines on your canvas.


 Take your Green Catania Grande for the stems and your needle.

Insert needle from back to front, just above the wood on your line. Go around the canvas and insert your hook again from back to front.


Stitch along the line evenly (not too even, as nature is not always evenly as well).


For the leaves, insert needle to the side of the stem and stitch 3 times in the same stitch.


Repeat stitching along the lines, adding randomly leaves to the stem.


Back side of the canvas


With sticky dots or a glue gun attach flowers to canvas on top of stems. To make it secure, add some stitches to each centre of flower.


And you're done!


Copyright Patricia Stuart 2014 ©.
You are free to create from the pattern and sell the creations.
Please do not copy, rewrite, resell or distribute as your own, this is prohibited.
Please give credit to my shop for the pattern and if you sell finished items online,
please provide a link to the shop (www.pukado.etsy.com) for the pattern.
Thank you for your understanding.


Please visit my blog: Pukado - Blog
Please visit any of my shops at Etsy, Ravelry or Craftsy
FaceBook me! @Pukado
Follow me on Pinterest


Wednesday, May 28, 2014

Crochet Mood Blanket 2014 - June Square - by Pukado Free Pattern


End of the month again, I’m up to date with my blanket! And whipped up a new square to make in June. It’s a flowery one again and a bit more open. Made again with Stylecraft acrylic yarn and hook size 4.5mm


10341448_645959342159989_6776528868602804921_n.jpg


But for the pattern I will be doing it a bit different. This square would be lovely with multiple colors, therefore I will be making the pictures of this pattern with vibrant colors from Phildar Phil No4 and hook size 3.5mm. Just to show you how pretty it can be with multiple colors.


I will join each row with an invisible join and weave in the ends.


June.jpg


R1, MC, 12DC in MC - 12st


R2, *PopCorn stitch, CH1* in each st around - 24st


***Pop Corn Stitch -
4DC in same st, drop loop, insert hook in the first DC, grab loop and pull through first DC***


R3, *{DC, TRDown, DC cluster}, CH2* in each CH1Space - 12 CH2Spaces


***TRDown is a Triple Crochet around the post of DC of R1***


June1.jpg


2014-05-030.jpg

R4, *(4HDC, CH1) in next CH2Space, (5HDC, CH2) in next CH2Space, (5DC, CH1) in next CH2Space* repeat around


R5, (R4 ended in the first  CH1Space onthe side, so that’s where I pick up again), 3DC in CH1Space, 6DC in next CH1Space, *(6DC, CH2, 6DC) in neaxt CH2Space, 6DC in next 2 CH1Spaces* repeat around, last series you will add 3DC to first CH1Space to complete the series. Do not fasten off, you will continue R6 in same color.


2014-05-031.jpg2014-05-032.jpg


R6, *CH3, SC on top of the next shell, CH3, SC on top of the next shell, CH3, SLST in corner CH2Space, CH3, SLST in same corner space, CH3, SC on top of the next shell, CH3, SC on top of next shell* repeat around


R7, SLST into next CH3Space, CH2, 3HDC in same CH3Space, *4HDC in each of next CH3Spaces until you reach a corner, 2HDC, CH2, 2HDC in corner space* repeat all around, SLST to first HDC.


Fasten off with invisble join, weave in all ends.


IMG_20140528_114726.jpg


Copyright Patricia Stuart 2014 ©.
You are free to create from the pattern and sell the creations.
Please do not copy, rewrite, resell or distribute as your own, this is prohibited.
Please give credit to my blog or Ravelry shop for the pattern and if you sell finished items online,
please provide a link to my blog or ravelry for the pattern.
Thank you for your understanding.


Please visit my blog: Pukado - Blog
Please visit any of my shops at Etsy, Ravelry or Craftsy
FaceBook me! @Pukado
Follow me on Pinterest


Saturday, March 22, 2014

Mandala by Pukado - Free Pattern - Ottoman cover

Mandala by Pukado


Supplies:


Catania Grande, but you can use any yarn you like.
Hook 6mm
Scissors
Yarn needle

Join every row with an invisible stitch, unless otherwise specified.

Change color every row, unless otherwise specified or personal choice.

Weave in ends after every row.


Thursday, February 13, 2014

Free Pattern - Toy - WaterMelophant Handpuppet - LOVE!

I was watching "Cloudy with a Chance of Meatballs 2" with the kids. And just the idea of food and animals combined was brilliant in my mind! Amazing the foodimals they have come up with, Fla-Mango's, Shrimpansees and so many more! And off course the WaterMelophant! So funny! And I and the kids fell in love with them.

I had a few ideas in my head forming and I started playing with my Phildar and needle... and 2 days later this is the result!


I LOVE IT!!! And so do the kids!!!

I wrote the pattern down while making it. I haven't tested it and hoping by following it, you will have the same result. To make it bigger, you have to adjust the increase rows in the beginning, but once you increase them, you have to increase the mouth circle and the trunk. So write down what you do!

If you have any questions, let me know!

Pattern after the break!

Monday, January 27, 2014

Crochet Your Mood Blanket - Februari Granny - Free Crochet Pattern

I have finished Januari!! And I love it! My colors for are:

Blue - Clever - Because I was playing with my The Most Almost Invisible Hat Seam!
Lavender - Lazy and creative - It was the last week of the holidays, we we're very lazy spending days in our PJ's and I was just happily crocheting and creating.
Green - Joyful - We were just full of joy, because my little boy had a brilliant first week at school.
Pink - Inventive - Working on patterns and patternwriting.
Red - Passionate - In my campaign against the heaps of dogpoo in front of my house!
Yellow - Happy - Again my boy did brilliant and even the mornings getting him out of the house is going supergreat!
Blue - To represent my lovely blue bruises I got after a night of Roller Skating with my friend.
Soft Pink - For having good friends and trying to be a good friend


As mentioned before, I will be doing a different Granny every month. And the granny I will be using for februari is this one:


It is the same size as the Januari Granny, so they will match perfectly!

The pattern for the Mood Granny is below, you can also download a PDF here!

Monday, January 20, 2014

So many things to do.. so little time!

Hello!! It has been a while again since I posted. So BUSY!!!

Love Hearts by Pukado

I have been working on my pattern a lot. As I said it was a frustrating process to get it to work. It was an even bigger pain to write it down so it makes sense! Sure I could write down the pattern how I made the hat. But my style of crochet is not like the majority. I crochet loose... very loose! That's why I need smaller needles to get the same effect as other crocheters. I write my patterns with my gauge in mind. Otherwise I can't write a pattern. But what I do with 5 stitches, somebody else does in 10 stitches. So to make a pattern that is suitable for every one, I had to make calculations and tables so it is easy for some one who buys my pattern to make a hat that fits perfectly. And therefore I had to make 2 hats with different gauge to proof my point.

Pulled a lot of hairs and the other half turned grey! But I did it! Pattern will be in my shops this week!

Crochet Your Mood Blanket 2014


Yesss I'm still going strong! I am up to date and changed the rules a bit in the last week. Instead of 1 granny square a week, I will be doing 2! Therefore my blanket will be at the end of the year 8 by 12 squares. And each square is 15cmx15cm (6"x6").  So with out a border the blanket will be 120cm by 180cm! Nice and big enough to cuddle up on the sofa on New Years Eve!


You know, I hate repeating stuff! So this blanket was going to be a challenge anyway. So to keep me interested I have come up with an idea! I will use a different Granny every month!

This Januari I'm using the Pukado Mood Granny. A free pattern I created for the Crochet Your Mood Blanket. You can find it here and here!

I have made 6 now in different Rainbow colors that reflected my mood


I am using this as a mood board.

The good and the bad thing is, that it only has positive moods on there. And No, my moods are not always positive. I have been missing Frustrated, Angry, Exhausted, Envious, Prickly and Bland. BUT, by using this mood board I will need to find the positive moods I was in that week to reflect in my blanket. So it's basically a Positive Mood Blanket! And if I really can't find a mood I will take the opposite from that mood and make it postivie!

So 2 more Grannies for Januari and one of my colors is leaning towards excited!!!

For the next 11 months I will need to design new Grannies. I want to keep the style the same, so I will be keeping the border. The centre of the Granny is where the change happens!


For Februari I have designed this Granny.


The centre is taken from my Granny with No Name (you can find the original here). I will be writing the pattern and taking step by step pictures this week and will post it here on the blog and on Ravelry.

These Grannies are beautiful with color changes every row. But for my mood blanket I decide to stick to one color!


Pressies


I have been busy with making presents for people who are dear to me. I can't say much, just in case they are reading my ramblings here! But I promise you, next month I will post some pictures!

Spring time!!!

I know it's crazy, but my head is in Spring time lalaland already! I have these amazing ideas in my head and in my sketchbook and I'm just hoping they will come out of my hook and yarn amazing as well! Just waiting for my yarn and coton to come in!!

Yarn Addiction

Yes... I told myself I was going to save money. I need a new camera and preferable a good lighting box (I use a DIY transformed cardboard box now, it does what it needs to do, but would love a gooooood one). No more yarn, I said... Don't do it!! I lasted a week... and then my yarn addiction took over and I ordered the most amazing colors from @mycraftlife on Instagram.


Imagine all the crochet possibilities!!

And last but not least: My Personal Life

All is well, happy all the way.. but it will still keep you busy!! Darn you personal life!!!


xoxoxo

Thursday, January 9, 2014

"The Most Almost Invisible Hat Seam" New Crochet Technique! Photo Tutorial

Seams! Aaarrrggggghhhh... horrible seams!!! I don't like seams, but they are inevitable.

I don't like working in continuous rounds, because of the weird end and changing colors are never smooth when working in continuous rounds.

I'm too lazy to join each row with an invisible join, weave in ends and randomly start another row some where else. Too much hassle. It will tho give you the best looking hat!

Normally I work my rows in the round and start every HDC row with a CH1 and DC rows with CH2 and then SLST to the first HDC/DC of the row to minimise my seam. But working on some baby hats this week, the seams were like ELEPHANTS in my imagination. They were so noticeable, in your face, there. I just shuddered every time I came back to the first stitch to see that seam become bigger and longer every time.
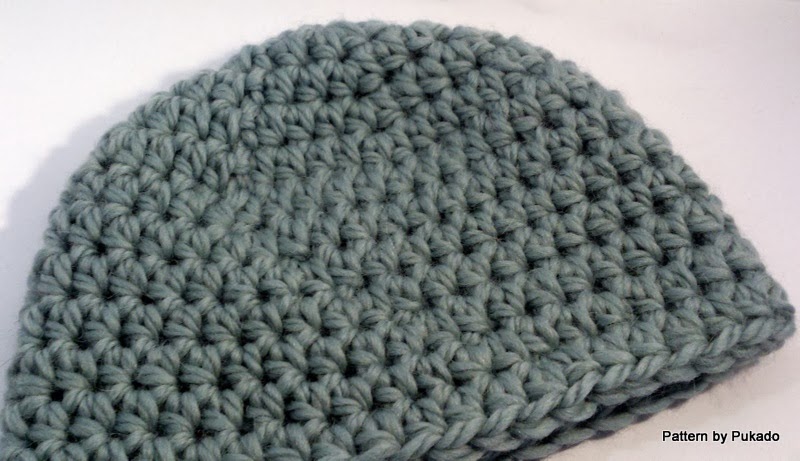
So I was going to solve the problem!! That's me.. I'm a Gemini...

Remember that Gemini are just a little neurotic! Well, maybe a lot more then just a little, but they tend to live off people's nerves. If they have something ticking over in their minds they find it impossible to sleep until the problem is solved.

Yes, I use that excuse often :)

So I think I crocheted enough rows to make 20 hats in the last 2 days, just to get the right joining stitch! Because something might look good in one row, but 10 rows later it's not quite what you wanted. So rippppp and start over!

Once I had the basics of my joining stitch written down, I crocheted again enough rows to make 20 hats again for the pictures! So a lot of rows have been made and only one baby hat was the result. But I'm really happy with the result!

There are a couple of methods to joining your rows:
1. Begin your row with CH2/CH3 and join your row to the chain at the end.

This does not make a nice seam. Big gaps and if my seam is an elephant, this one is an argentinosaurus!

2. Begin your row CH2/CH3 and SLST to first ST (HDC, DC) of your row.

This will give you a nicer seam, at least the big gaps from method 1 are gone. But it will leave you with bulky seam.

3. Begin your row with a decreased Chain, CH1/CH2 and SLST to first ST (HDC, DC) of your row.

This is the one I used before the most and yes the seam is nice and not so bulky. I would recommend this joining, if you don't want to try out my new technique :) see picture at the side. It's almost invisible.


So what's my big invention? To create the body of the stitch in the last stitch of your row. It sounds weird but once you get it, it's simple!

This is what my baby hat looks like now!


As an example I used white to show you how the stitch works.


Ok let's get down to business!
PDF FILE Download of this blog post available here!
HDC Joining:


And?? Do you like??

Here is the DC version:


Please let me know, if it's working for you! I'm very curious!!


Copyright Patricia Stuart 2014 ©.
You are free to create from the pattern and sell the creations.
Please do not copy, rewrite, resell or distribute as your own, this is prohibited.
Please give credit to my shop for the pattern and if you sell finished items online,
please provide a link to the shop (www.pukado.etsy.com) for the pattern.
Thank you for your understanding.


Please visit my blog: Pukado - Blog
Please visit any of my shops at Etsy, Ravelry, Crochetville or Craftsy
FaceBook me! @Pukado

Follow me on Pinterest